How to create an e-mail account
Updated: 10/23/2024 by Computer Hope

E-mail is a great way to send and receive information over the Internet. However, as there are many e-mail and webmail clients, the steps used to start an account differ. To learn how to create a new e-mail account (and associated e-mail ID) in various programs, choose from the list below and follow the instructions.
Tip
You can have more than one e-mail address. If you've already got an e-mail account, these steps can still be followed to create another e-mail address.

Google Gmail
- Go to the Gmail website and sign in if necessary.
- At the bottom of the sign in screen, click the
 link.
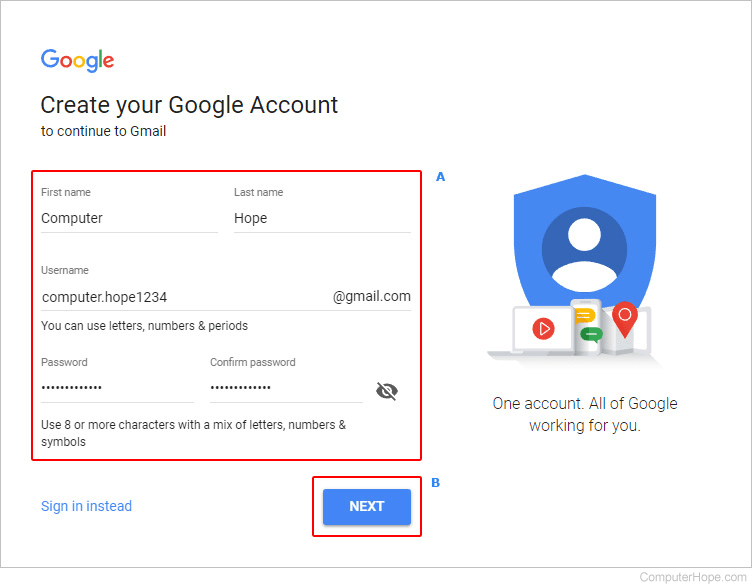
link. - On the account creation screen, fill out all the fields (A), and click Next (B).
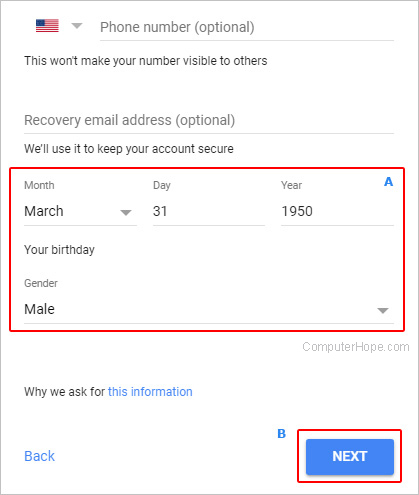
- On the next screen, fill out your birth date and gender (A) and any other information you are comfortable with, then click Next (B).
- Read Google's Privacy and Terms, then click the
 button.
 - Click the
 button until you've moved through the features menu.
 - Click the
 button, allowing you to access your new account.

Outlook.com (formerly Hotmail)
- Go to the Outlook.com website and sign in if necessary.
- Click the
 button.
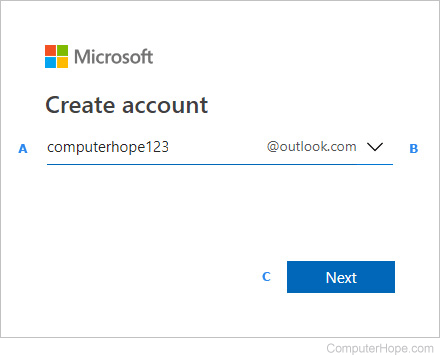
 - On the next screen, choose a username (A) and a domain (B), and click Next (C).
- Choose a password and click the
 button.
 - Type your name and click the
 button.
 - Choose a country, enter your birthdate, and click the
 button.
 - Choose a country code, enter a phone number, and click the
 button.
 - Enter the access code and click the
 button.
 - Navigate through the rest of the prompts and your account is opened.

Yahoo! Mail
To access Yahoo! mail, you first must create a Yahoo! account.
- Navigate to the Yahoo! account sign up page.
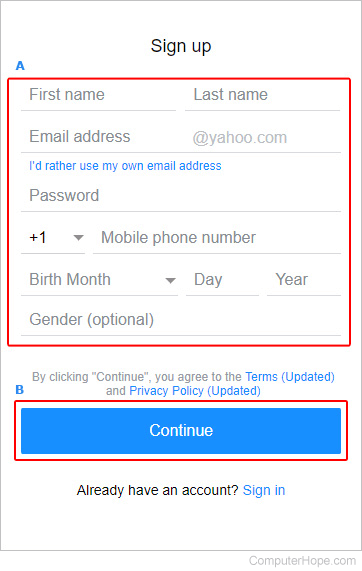
- Fill out the required fields (A) and click the Continue (B) button.
- Click the
 button.
 - Enter the five-digit key and click the
 button.
 - Click the
 button.
 - Click the
 icon.
icon.

Aol Mail
To access Aol Mail, you must first create an Aol account.
- Navigate to the Aol account sign up page.
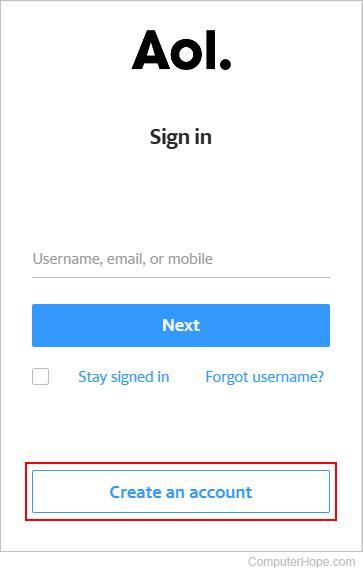
- Click the Create an account button.
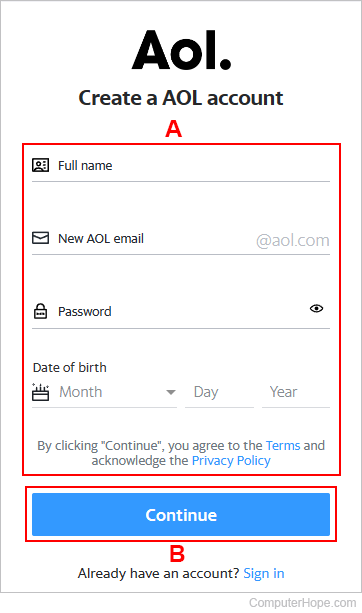
- Fill out the required fields (A) and click the Continue (B) button.
- Click the
 button.
 - Enter the key and click the
 button.
 - Click the
 button.

Microsoft Outlook
Note
These instructions only work with Outlook 2007, 2010, and 2013.
- Open Outlook.
- In the Add Account Setup window, make sure the circle next to E-mail Account is selected.
- Fill out the form and click the
 button.
 - Once the setup process is done, check the box next to Change account settings and click the
 button.
 - Click More settings.
- Click the Advanced tab.
- Next to Root folder path: type Inbox.
- Click OK, and then Finish.

Mozilla Thunderbird
- Open Thunderbird.
- Click Tools, and select Account settings from the drop-down menu.
- Click the circle next to Email account, and click Next.
- Enter your name and an e-mail address that you want to use.
- Select POP (Post office Protocol) or IMAP (Internet Message Access Protocol) for your server.
- Enter your e-mail address for the incoming and outgoing user names, and click Next.
- Choose an Account Name.
- Verify your account information, and click Finish.
- Choose an Outgoing server.
