
How to install a CD, DVD, or another disc drive
Buying tips and help
If you have not already purchased a CD (compact disc) drive, see the CD buying tips section before continuing.
How to determine the CD drive type
Before getting started
- Ensure you have a working bootable floppy diskette with CD-ROM drivers.
- Write down important information from the top or bottom of the CD-ROM such as the Model Number, Serial Number, and specifications.
- Ensure you are familiar with ESD (electrostatic discharge) and its potential dangers.
- When physically installing the CD drive, ensure the computer is powered down and unplugged.
Set jumpers
Before installing the CD drive, it's important that the drive has the jumpers appropriately set to primary, secondary, or cable select. For example, a disc drive using the same cable as the hard drive should be set a secondary, and the hard drive needs to be primary or dual master.
We recommend when installing a CD-R (compact disc recordable) or CD-RW (compact disc re-writable) drive that the drive be set up as the primary drive on the second IDE/EIDE interface. Having the drive as the primary helps prevent buffer underruns when creating a CD.
Attach cables
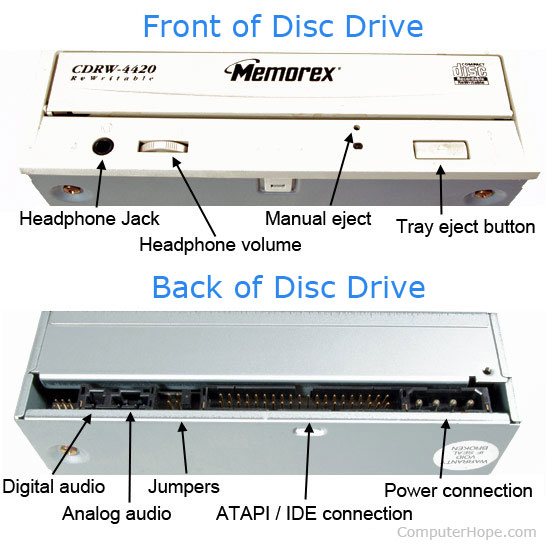
The CD-ROM (compact disc read-only memory) should have two cables connected to it and may have an audio cable, which is the smallest of the cables. When connecting this cable to the CD-ROM drive, it should be a 3 or 4 pin cable connection (see above picture). Make sure you are connecting this cable the cable plug and not the jumpers on the back of the drive. While it may be possible for the cable to connect to these pins, this could cause additional issues.
Next, connect the 40-pin IDE/EIDE interface cable (large gray ribbon cable) to the back of the CD-ROM drive. This cable has one side of the cable that is red or blue indicating pin 1. This side of the cable often points to where the power connects to the CD-ROM drive.
Finally, connect the Molex style power cable to the back of the CD-ROM drive. This cable is keyed, therefore it should only connect to the computer in one orientation.
Once the cables are connected to the drive, connect the opposite ends of the IDE/EIDE interface cable and the audio cable to their appropriate locations. The audio cable will connect to one of the following locations: sound card, motherboard (when onboard sound present), or DVD (digital versatile disc) decoder card.
BIOS setup
Once the disc drive is connected to the computer, place the case back on the computer. Connect the keyboard, monitor, and power to the computer. (We recommend you do not connect all the cables yet. If you experience problems, you may have to disconnect all the cables again.)
Once connected, turn on the computer and enter BIOS setup. Verify that the IDE (integrated drive electronics) device is set up as Auto or CD Drive. Once verified, save the settings and reboot the computer.
Software setup
IDE/EIDE CD-ROM drives only require the one or two CD-ROM drives for the drives to work.
If you are using MS-DOS, you need the MS-DOS driver and MSCDEX. For additional information about loading and configuring these drivers on your computer, see our CD-ROM driver page.
If you are using Windows 9x, Me, 2000, or XP, and if the drive is installed correctly, it should be detected automatically and installed when the computer first boots up.
CD drivers are found on our CD-ROM, CD-R, CD-RW, and DVD drivers page.